Before you begin, confirm that you have:
-
An active PlanOmatic account with access to integration settings.
-
An active Rentvine account with Administrator access or permission to create API keys.
-
Your Rentvine subdomain, which you can find in your Rentvine URL.
Step 1: Log in to PlanOmatic
Go to the PlanOmatic application at 'app.planomatic.com' and log in with your credentials.
Step 2: Click "Manage Integrations"
From the PlanOmatic dashboard, open the 'Manage Integrations' area.

Step 3: Click "Enable" next to Rentvine
Locate the Rentvine integration in the list and click 'Enable' to begin setup.

Step 4: Enter the Rentvine subdomain
Enter your Rentvine subdomain, then continue to your API Key and API Secret (you'll get these from Rentvine in the next steps).
|
Note: The subdomain is the part of your Rentvine URL that appears between "https://" and "rentvine.com" (e.g., in https://yourcompany.rentvine.com, the subdomain is "yourcompany")
|

Step 5: Log in to Rentvine in a new browser tab
Open a new tab and log in to your Rentvine account — you'll need this to generate an API key.
Step 6: Click the profile icon
In the bottom left of Rentvine, click your profile icon to open the account menu.

Step 7: Click "Settings"
Select 'Settings' from the profile dropdown menu.

Step 8: Click "Users, Roles and API"
In the Settings menu, navigate to the 'Users, Roles and API' section.

Step 9: Click "API"
Within Users, Roles and API, select the 'API' tab.

Step 10: Click "New API Key"
Click the button to create a 'New API Key' to the right of the Access Keys.

Step 11: Name the new API key
Enter "PlanOmatic" as the name of the new API key so it's easy to identify later.

|
Note: This documentation uses "PlanOmatic Instructions" as an example name — any clearly identifiable name works.
|
Step 12: Set the role to "Administrator"
Set the API key's role/permission level to 'Administrator' so PlanOmatic can sync the property data.

Step 13: Click "Save"
Save the new API key.

Step 14: Copy the API Key and API Secret
Copy both the API Key and API Secret and paste them into a notes application for easy reference — you'll need them in the next steps.
|
Note: Treat the API Secret like a password. Don't share it or store it anywhere unsecured.
|
Step 15: Navigate back to PlanOmatic
Switch back to the PlanOmatic browser tab.
Step 16: Enter the API Key and API Secret in PlanOmatic
Paste the API Key and API Secret you copied from Rentvine into the corresponding fields on the same 'Connect with Rentvine' form shown in Step 4.

Step 17: Manage configuration settings
Review and adjust the integration configuration settings, such as 'Auto-Sync Assets' and 'Watermarked Photos', as needed.

Step 18: Click "Save & sync properties"
Save your settings and trigger the initial property sync between Rentvine and PlanOmatic in the bottom right side of the screen.

Step 19: Confirm your properties appear correctly
Your Rentvine properties will now populate automatically in PlanOmatic, confirming the integration is working.

Troubleshooting
-
Properties don't appear after syncing: Double-check the API Key and API Secret were copied without extra spaces, and confirm the API key's role is set to Administrator in Rentvine.
-
"Invalid subdomain" error in PlanOmatic: Verify you entered only the subdomain portion of your Rentvine URL, not the full URL (no "https://" or ".rentvine.com").
-
Can't find "Users, Roles and API" in Rentvine: This section is only visible to users with Administrator permissions in Rentvine. Contact your Rentvine account admin if you don't see it.
How to Sync Photo Assets to Rentvine
Once the Rentvine integration is enabled (see the article above), you can sync a property's photos and other media assets from PlanOmatic directly to Rentvine in just a few clicks.
Before you begin
- The Rentvine integration must already be enabled in PlanOmatic (see "How to Enable the Rentvine Integration in PlanOmatic" above).
- The property order must show a status of Order Delivered, with assets ready to manage.
Step 1: Log in to PlanOmatic
Go to the PlanOmatic application and log in with your credentials.
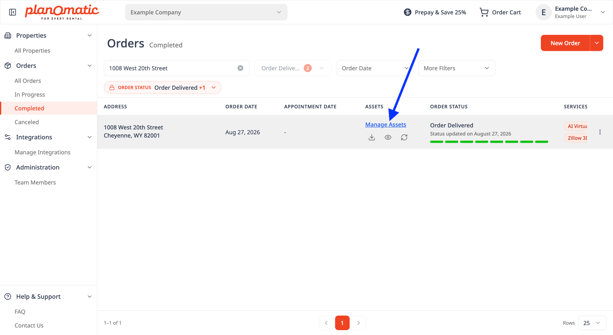
Step 2: In Existing Orders, find the address and click "Manage assets"
Go to 'Orders' → 'Existing Orders', locate the property, and click 'Manage Assets' in the Assets column for that order.
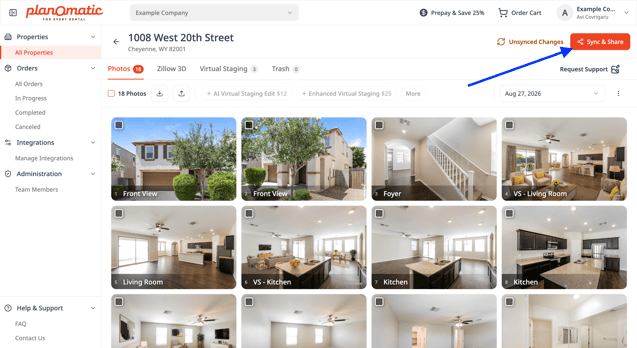
Step 3: Click "Sync & Share"
Click the 'Sync & Share' button in the top right side of the page.
Step 4: (Optional) Toggle Watermark on or off
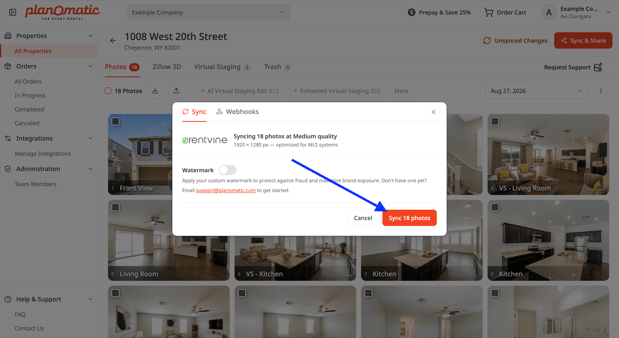
In the Sync assets dialog, the Watermark toggle is off by default. Turn it on if you want to send watermarked photos to Rentvine.
|
Note: Don't have a watermark on file yet? Contact PlanOmatic support at support@planomatic.com to get one set up.
|
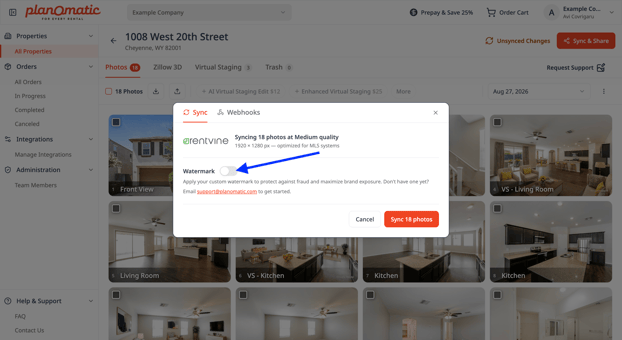
Step 6: Click "Sync assets"
Click the 'Sync photos' button to send the selected photos to Rentvine.
Step 7: Log in to Rentvine to confirm your photos synced
Switch to Rentvine and check the property record to confirm the photos arrived successfully.
Troubleshooting
-
The Sync button is grayed out: Make sure at least one photo is selected using the checkboxes before clicking Sync.
-
Photos aren't appearing in Rentvine after syncing: Confirm the Rentvine integration is still enabled and the API credentials haven't expired or been revoked. Re-check the setup in "How to Enable the Rentvine Integration in PlanOmatic."
-
Watermark toggle has no effect: You need a watermark on file with PlanOmatic first. Contact support@planomatic.com to get a custom watermark set up for your account.
Need more help? Contact PlanOmatic support.











.png?width=1200&height=800&name=Rentvine%20integration%20(1).png)